
Staring at your mic, camera, or blank desk wondering where to start?
You’ve got ideas and something worth sharing. Maybe people want to listen too. But now you’re stuck Googling the pros and cons between fancy studios and DIY hacks. I get it.
Back in 2015, I started with a budget webcam, a mic gifted by my mom, and Zoom. No fancy gear, just showing up and sharing my story from my home office in Sydney.
If you’re a coach, consultant, author, speaker, or expert aiming for visibility, this guide is for you.
Whether you’re hosting your own show or guesting on others, your setup doesn’t need to be perfect; it just needs to work.
Inside, you’ll find practical podcast setup ideas for all creators: solo or multi-host, budget or all-in, audio-only or video. Gear lists, layout tips, and setups that actually make sense.
Let’s get you set up right.
How to Set Up a Podcast
Setting up your very first podcast is easier than you think. Some podcasters start with the basics: a USB mic, free software, and a quiet room. Others jump in with high-quality gear and video setups right away.
There’s no single right way to do it.
But if you’re unsure what you actually need to get started, here’s a quick checklist to help you figure out what works best for you and your budget
Items needed to start a podcast (Checklist)

Here’s what you actually need to get your podcast recorded, edited, and published. Nothing extra, just the essentials:
- Microphone: Start with a reliable USB mic like the Samson Q2U or Razer Seiren V3 Mini. Clean audio matters more than anything else.
- Headphones: Use closed-back headphones (like the Audio-Technica M20x or Sony MDR-7506) to catch issues as you record and edit.
- Mic stand or boom arm: Keeps your mic steady and at the right height. A tripod stand works fine, but a boom arm gives more flexibility.
- Pop filter or windscreen: These help soften sharp “p” and “s” sounds so your voice sounds smoother.
- Computer or laptop: A stable machine for recording, editing, and uploading your episodes. Doesn’t need to be high-end, just reliable.
- Recording software: Start with something simple like Audacity, GarageBand (for Mac), or Ocenaudio. They’re free and get the job done.
- Quiet recording space: Rugs, curtains, cushions, anything soft helps tame echo. A few foam panels behind the mic help, too.
- Podcast hosting platform: Upload your audio, publish episodes, and get listed on Spotify, Apple, and more. Try Spotify for Podcasters, RedCircle, or Buzzsprout.
- Optional: Audio interface for XLR mics, acoustic treatment, camera and lights for better video quality, plus a backup recorder like the Zoom H1n.
How to start a podcast step by step
From idea to published episode, here’s how to get your show off the ground without getting lost in the weeds:
- Lock in your podcast idea: Who’s your audience? What’s your focus? Be specific. Instead of “business tips,” think “quick marketing wins for busy coaches.”
- Pick your format and structure: Solo, interviews, coaching sessions? Weekly or daily? Decide episode length and flow.
- Choose your gear and space: Use the checklist above. If you’re starting from home, a USB mic and a quiet corner with soft furnishings can be all you need.
- Set up your equipment and software: Check mic levels, wear headphones, and do a quick test recording. This is a crucial part of what makes a good podcast.
- Create a loose script or outline: Jot down an intro, 2-3 key points, and a call to action or outro. Keeps you from rambling or freezing up mid-recording.
- Record your first episode: Find a quiet time, hit record, and talk like you’re speaking to one person, not performing for a crowd. Don’t aim for perfect.
- Edit your audio: Trim the pauses, adjust the volume, and cut any background noise with tools like Audacity or GarageBand.
- Export and name your file: Save as Ep01-Name.mp3, add metadata and cover art so it looks clean in podcast apps and podcast directories.
- Upload and publish: Choose a podcast host, upload, add title and description, and publish. Your RSS feed handles the rest.
- Promote your episode: Share it with your email list. Post a clip on socials. Mention it in your next client call. If you’re using podcasts to grow your brand, visibility starts with telling people it exists.
Podcast Setup Ideas at Home
Starting at home means working with what you’ve got, and that’s more than enough. Here are some everyday spaces that can become your best recording spots with a few smart tweaks.
- Closet studio: Clothes dampen sound naturally and make a surprisingly solid DIY vocal booth. Add a lamp and clip-on mic to complete it.
- Bedroom corner: A soft, carpeted area near a bed or curtains works great. Add some foam panels behind the mic to reduce echo.
- Living room nook: Bookshelves, throw pillows, and even a sofa can act as makeshift acoustic treatment.
- Home office: Ideal if already quiet. Add a rug under your chair and record near soft furnishings to cut reverb.
- Under-stairs hideaway: Tuck a small desk under the stairs and line the wall with moving blankets or foam tiles.
- Kitchen table with a twist: Add a thick tablecloth and record during off-hours. Surprisingly clear acoustics if the space isn’t too open.
The goal is a calm, quiet space where your voice shines without distractions. With a little creativity, your home can be the perfect studio to get started.
What do you need to start a podcast at home?
Starting a podcast at home doesn’t need fancy gear or a dedicated studio. You can get going with what you’ve already got, plus a couple of small upgrades.
- A space with soft materials: Prioritize quieter rooms with carpeting, curtains, or even blankets to reduce bounce-back.
- A recording device you already own: Use your smartphone, laptop, or tablet with voice recording apps to test episodes.
- Headphones you have handy: Any headphones are fine to start, as long as you can hear audio clearly without feedback.
- Free recording/editing apps: Try Voice Memos (iPhone), Lexis Audio Editor (Android), or Ocenaudio (Windows/Mac).
- A DIY pop filter: Stretch a nylon stocking over a wire hanger or use a clean sock over the mic to block plosives.
- Portable noise control: Record inside a closet or behind a thick curtain. Hang up a duvet to trap sound.
This setup gets you on air fast with almost no upfront cost. As you grow, you can upgrade gear and tweak your space, but this will get your voice out there and your message heard.
Podcast Setup for Beginners
Starting your podcast should be simple, not a headache. Your setup depends on how many people will be talking and how much gear you want to work with.
Here’s the full breakdown on what you need for anything from solo shows to four-person chats. All are easy to use and sound great.
Best podcast setup
Sometimes, simple is best. Here’s a simple podcast setup with gear that balances quality and ease, perfect for solo podcasters or anyone just getting started.
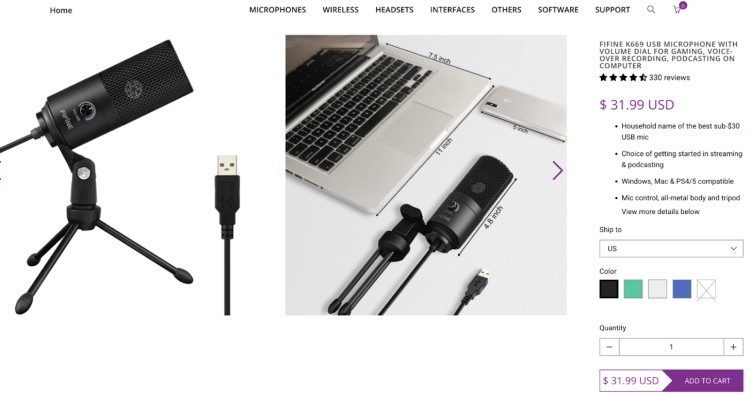
- Simple USB mic: A plug-and-play mic like the FIFINE K669B gives clean audio without requiring extra gear.
- Plug-in headset mic: Lightweight headset mics work well for solo hosts or on-the-go recording.
- Basic foam pad: Just one foam tile behind your mic can make a noticeable difference in echo.
- Self-timer visual cue: Use your phone as a timer for pacing, especially during solo episodes.
- Index card bullet points: Jot quick reminders or intros to keep your delivery smooth and structured.
- Quiet time routine: Record during times when household noise is lowest (e.g., early mornings or late evenings).
This podcast setup idea is perfect if you’re flying solo or doing remote interviews and want good sound fast.
Cheap 2 person podcast setup
Two people on the mic means avoiding overlap and keeping things clean:
- Back-to-back USB mics: Set them up on opposite sides of the table, angled slightly away from each other.
- Shared pop filter: A dual-layer pop filter can help reduce plosives for both speakers.
- Audio splitter cable: Use a splitter to let both hosts hear playback from a single laptop output.
- Dual mic software: Try software like Zencastr or Cleanfeed for browser-based, dual-channel recording.
- Rotating host notes: Print shared cues or transitions to help stay in sync without interrupting.
- Cardioid mic positioning: Angle cardioid mics away from each other to minimize crosstalk.
This cheap podcast setup keeps both voices clear and lets you control levels easily.
Podcast setup for 3
Bring in a third person and you’ll want gear that handles multiple voices clearly:
- Tripod boom arms: Space-saving and flexible when managing multiple mics on a small table.
- Circular table layout: Helps maintain eye contact and improves conversational flow.
- In-ear monitors: Less bulky than over-ear headphones and prevent mic bleed.
- Color-coded mic flags: Label each mic with color tape or flags to stay organized during setup and post.
- Backup SD recorder: Devices like Tascam DR-40X offer peace of mind in case the software crashes.
- Live cue cards: Helpful for signaling time checks, transitions, or topic shifts mid-recording.
This setup gives everyone their own space on the track, so you get balanced, professional sound.
4 person podcast setup
With four people, you need a setup built for control and clarity:
- Mics: Four dynamic mics like Rode PodMic or Shure SM7B are tough on noise and crystal clear.
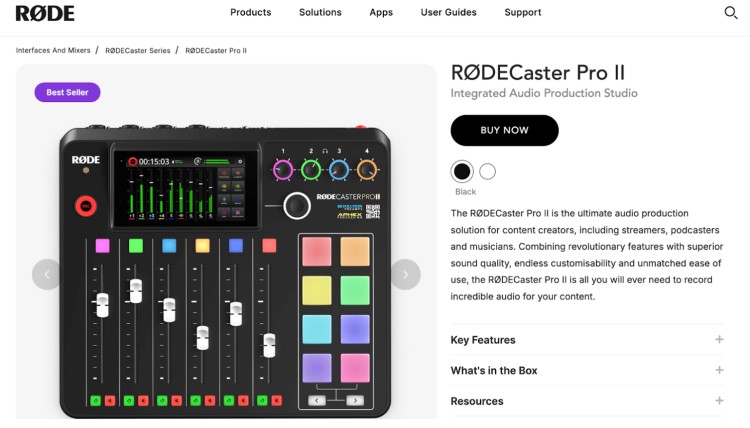
- Mixer or audio interface: A four-input or more mixer such as Rodecaster Pro II or Focusrite Scarlett 18i8 to manage levels independently.
- Headphones: Four pairs of closed-back headphones to prevent audio bleed.
- Table mic mounts: Clamp-on mic arms help maximize table space and keep things tidy.
- Split-screen video layout: For video, use a camera-per-side setup or one wide cam with strategic framing.
- Talk light or LED cue: Use a small “on-air” light to signal when someone is speaking or to wrap up.
- Chair placement grid: Mark chair and boom positions with tape for a consistent setup each session.
- Live monitor headphones: Run an audio splitter or headphone amp so everyone can monitor audio live.
- Shared Google Doc script: Keep intros, sponsor reads, and timing in sync across hosts and guests.
If you want to simplify, podcast equipment bundles like the Rodecaster Pro II kit come with all the gear you need, ready to go for a 4-person podcast setup.
Podcast Setup Ideas for Small Spaces
Working with limited room doesn’t mean you have to compromise on sound or style. Small spaces can still deliver a big podcasting impact with the right setup and smart use of space.
Podcast desk setup ideas
Keep your setup compact but capable. Here’s how to make a small desk work:
- Compact boom arm: Frees up desk space and keeps your mic where you need it without blocking your face.
- Cable management tools: Velcro ties or adhesive clips keep cords tidy and stop them from tangling.
- Low-profile mic + stand: A tabletop mic like the Samson Q2U or a small tripod stand saves room and still delivers solid sound.
- Laptop + second screen (optional): Use your laptop for recording and a second screen for notes, timers, or live chat monitoring.
- Soft desk lighting: A dimmable desk lamp helps you look decent on camera without making the space hot or harsh.
- Foldable acoustic panels: Portable foam or fabric panels that can be stored away when not in use.
A tidy, efficient desk setup keeps you focused on recording, not fumbling with gear.
Podcast room setup ideas
Even a closet or bedroom corner can be turned into a solid recording space:
- Soft furnishings: Rugs, curtains, pillows, or even a coat rack of clothes can soak up echo.
- Acoustic foam panels: Stick a few behind and to the sides of your mic setup to help control reverb.
- DIY vocal booth: Wrap a few towels or moving blankets around a coat rack or mic stand to create a simple sound booth.
- Foldable dividers or screens: Add privacy and reduce background noise. Great if you’re recording in a shared space.
- Low-noise furniture: Avoid squeaky chairs or wobbly tables. You don’t want background creaks in your audio.
- Keep clutter out: Remove visible clutter in your podcast room setup that might cause distracting noise or reflections during recording.
How much does it cost to set up a podcast room?
You can get a decent setup without going all in from day one. Here’s a rough breakdown:
- Starter setup ($100-$300): USB mic, boom arm, closed-back headphones, and a few acoustic foam panels.
- Mid-range ($300-$700): Add a better mic (XLR), audio interface, more sound treatment, and studio lighting.
- Pro setup ($700+): High-end mics, multi-person mixers, full acoustic treatment, and on-camera upgrades.
Start where you are, and improve as your show grows.
What equipment should you have in a podcast room?
This is your podcast starter kit checklist for any podcast space, focusing on what really makes a difference in sound quality and ease of use.
- Microphone: Go for a dynamic mic like the Shure SM58 or Rode PodMic if your room isn’t soundproof.
- Boom arm or mic stand: Keeps your mic steady and lets you position it easily, even in a tight spot.
- Closed-back headphones: Helps you monitor audio while blocking out external noise.
- Laptop or recording device: Run your DAW (like Audacity or Riverside) and manage recording sessions.
- Pop filter or windscreen: Reduces plosives (like “P” sounds) and keeps your audio clean.
- Acoustic treatment: Even a few foam tiles or blankets can make a big difference in echo reduction.
- Comfy, quiet chair: Trust me. If it squeaks, it’ll get picked up.
Video Podcast Setup Ideas

Video podcasts are growing fast, but setting one up doesn’t have to be complicated or expensive.
Whether you’re starting with just a phone or ready to invest in gear, these ideas will get your video podcast up and running.
Setting up video podcast step by step guide
Starting your video podcast involves more than just hitting record. Here’s a straightforward path from idea to launch perfect for all types of podcasts:
- Plan your content and format: Are you doing interviews, solo episodes, or panels? Visualise how many people will be on camera and where they’ll sit.
- Choose your recording gear: Use your phone or webcam for video, and USB or XLR mics for sound. Don’t worry about perfect gear at first.
- Find a quiet, well-lit spot: Natural light works well, or grab a ring light to brighten your face.
- Record remote interviews: Use free tools like Zoom or Google Meet to record. For better quality, consider platforms like Riverside or StreamYard, which record each person separately.
- Edit your footage: Use free apps like iMovie or CapCut to trim, add titles, and polish your videos.
- Upload and host: YouTube is the easiest free option for video hosting. Create a channel and start uploading episodes.
- Promote your show: Share clips on Instagram Reels, TikTok, or Shorts. Use free tools like Canva for branded intro/outro screens.
This simple step-by-step approach helps you focus on content and consistency, not gear or heavy podcast editing.
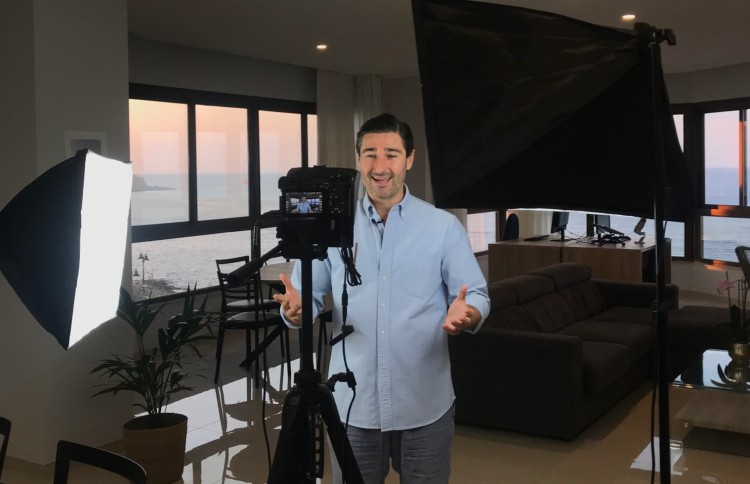
Video podcast lighting setup
Good lighting makes a huge difference to how professional your podcast looks on screen. Here’s how to light your setup:
- Use natural light where possible: Face a window for soft, even light.
- Ring lights: Affordable and easy to set up, they add consistent light to your face.
- Softbox lights: If you want to upgrade, these soften harsh shadows and give a flattering look.
- Avoid overhead or harsh lights: They create unflattering shadows and shine.
- Use a fill light: Place a secondary light opposite your main source to reduce shadows.
- Background: Keep it clean and uncluttered, with no bright distractions.
Try to test the lighting before recording to make sure you’re well-lit without glare or shadows.
Simple video podcast setup
If you want to keep your video podcast studio lean, here’s what you need to start recording video podcasts at home or on the go:
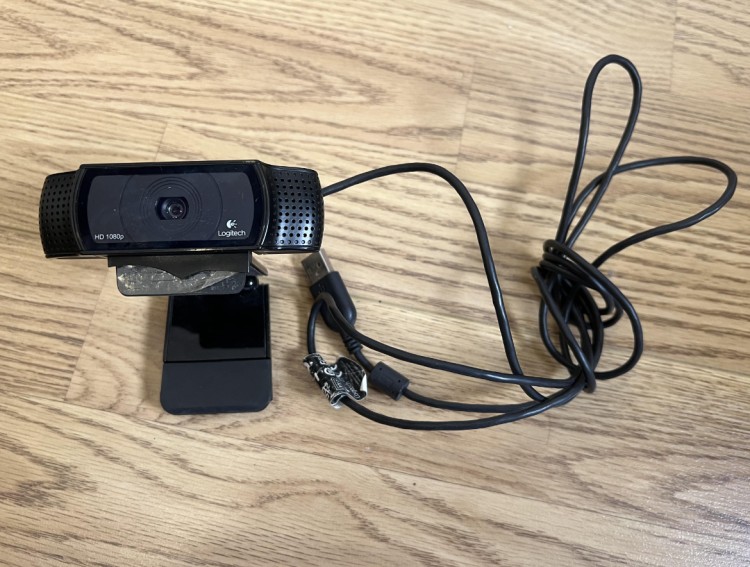
- Camera: Your smartphone or a basic webcam like Logitech C920 works fine.
- Microphone: USB mics like Blue Yeti or Audio-Technica ATR2100x for clear sound.
- Lighting: A ring light or natural window light is enough to brighten your face.
- Headphones: Any closed-back headphones to avoid echo while recording.
- Recording software: Zoom, Google Meet, or free apps like OBS Studio to capture video.
- Editing software: Free apps like iMovie or CapCut to polish your video before uploading.
- Hosting: YouTube for free video hosting and exposure.
This podcasting 101 studio space is easy to get started with and lets you test your format and recording environment before upgrading gear or committing to long recording sessions and podcast production.
Podcast Background Setup Ideas
Your podcast background doesn’t need to be fancy, just intentional. A good backdrop keeps the focus on you, looks polished on camera, and gives your brand some personality without distractions.
How should you design the background for a podcast room?
Your background shows up in every video, so make it count (even in a small space):
- Keep it tidy: Clutter in the background distracts from what you’re saying. Clear shelves, hide cables, and skip the mess.
- Add some character: A plant, a framed poster, or a shelf with books adds warmth and personality.
- Use soft lighting: A ring light or small key light can brighten you up without overpowering the space.
- Show your brand: If you’ve got a logo, podcast cover, or custom sign, place it behind you.
- Avoid mirrors or reflective surfaces: They bounce light and audio which is not great for looks or sound.
Podcast lighting setup ideas
Lighting can make or break how your podcast looks on video. Here’s how to keep it simple and flattering, without complicated or pricey gear:
- Key light: Your main light, placed at a 45-degree angle for natural shadows. A ring light or softbox works well.
- Fill light: Opposite the key light to soften shadows. A desk lamp with a diffuser or white sheet can do the job on a budget.
- Backlight (or hair light): A small light behind you adds depth and separates you from the background.
- Natural light (if available): Face a window for soft, flattering light. Avoid windows behind you unless balanced with other lights.
- Use warm, soft lighting: Skip harsh overhead bulbs. Aim for soft, diffused lighting between 3200K and 4500K for consistent skin tones.
- Control your lighting: Use blackout curtains or keep lights at the same brightness to avoid flicker or daylight shifts.
Want it to look polished without much effort? Set your lighting once, mark your spots with tape, and you’re good to go every session.
Podcast Studio Setup Ideas
A proper home studio setup makes your podcast audio quality sound better, your workflow smoother, and gives you a more consistent recording space.
Ready to upgrade your podcast studio design? Here’s what goes into a solid podcast studio setup:
- Sound-treated room: Use foam panels, carpets, heavy curtains, and bookshelves to control echo.
- Functional desk or station: Choose a desk that holds your gear comfortably and hides cables where possible.
- Dynamic mics on boom arms: Shure SM58 or Rode PodMic mounted on boom arms allow flexible positioning.
- Individual closed-back headphones: Everyone wears their own for monitoring without audio bleed.
- Multi-input mixer or audio interface: Devices like Focusrite Scarlett 18i8 or Rodecaster Pro II to manage multiple mics.
- Even lighting and camera setup: Use ring lights or softboxes and cameras with wide-angle lenses for groups.
- Reliable power supply and backups: Surge protectors and redundant file backups keep your sessions safe.
- Gear labeling system: Mark cables, mics, and headphones to speed up setup and avoid mixups.
Going all in with your home podcast studio design ideas? Check this out to help you pick the best laptop for podcasting.
Stop Googling and Get Podcasting
You don’t need to set up a podcast studio with the “perfect gear” right away. Podcast setup ideas are all about what works for you and your message.
Whether you’re recording solo in a closet or hosting a full high-quality podcast studio session, the best podcast studio setup gets your voice heard, not lost in tech headaches or fancy gadgets. Take what fits your style, budget, and space, and record your podcast.
The most important thing? Show up and share what only you can say.
Ready to get your podcast heard by the right people? Create your free Talks creator profile and start connecting with podcast hosts ready to feature fresh voices like yours.
Help Me Get Featured on Podcasts Fast


