")
So, you’re about to hit record for the first time and your brain is doing somersaults checking the podcast mic, double-checking the record button, wondering if your WiFi will ruin everything.
I get it. Been there, panic sweats and all.
But after 400 interviews on both sides, I’m telling you it’s actually way easier than you think to record interviews remotely.
All you really need is a solid plan, a high-quality podcast topic that makes you excited to speak, a decent podcast equipment setup, and a quiet corner where the neighbors aren’t testing their drum set.
In this guide, you’re going to get the full lowdown on how to record a podcast like a pro even if this is your first rodeo:
- The best podcast gear and software for every budget (yes, even if you’re on a budget but determined)
- Where and how to record your episodes (home, studio, or online with your favorite guest)
- Podcast editing tips that make you never second-guess if it’s “good enough”
- Publishing and promotion tricks to get your podcast in front of real people
By the end of this, you’ll know exactly how to record podcasts and video interviews that don’t make your listeners want to click away (and you might even have fun doing it).
What Equipment Do You Need to Record a Podcast?
Professional-sounding audio starts with the basics. With a solid mic, headphones, and a quiet space, you can record episodes that get noticed and make an impact even on your first try
At a minimum, people recording using:
- Microphone: USB microphones are simple and plug-and-play; XLR mics give you studio-level quality. Either way, your voice will sound clear and crisp compared to a built-in mic.
- Headphones: Closed-back headphones help you spot background noise before it sneaks into your recording.
- Remote podcast recording software: This is where the magic happens. A good podcast recorder lets you capture, monitor, and edit audio easily.
Your setup depends on the recording device you’re using. Here’s how to easily record podcasts smoothly across the most common options.
How to record a podcast on an iPhone
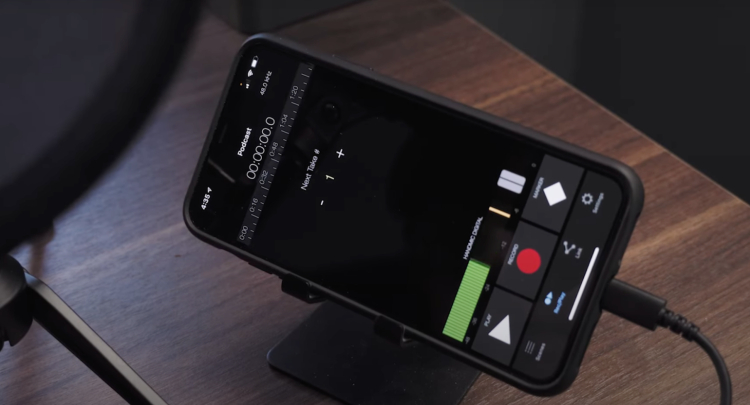
Best for: Solo podcasters on the go or quick interviews
Recording quality: Medium-high with an external mic
Difficulty: Beginner-friendly
What you need:
- Lightning or USB-C mic (Shure MV7 or Rode VideoMic Me-L)
- Headphones
- Recording app (Ferrite, Voice Memos, or GarageBand iOS)
How to record:
- Find a quiet spot: Soft surfaces reduce echo.
- Plug in your mic: Confirm your phone recognizes it.
- Open your app: Select the external mic as input.
- Position your mic: About six inches from your mouth.
- Hit record: Speak naturally and watch levels.
- Review and trim: Use Ferrite to remove pauses or noise.
Quick win: Recording a podcast on a phone is simple and a surprisingly capable podcast recorder when you pair it with the right mic and environment.
How to record a podcast on Spotify
Best for: Beginners who want a simple, remote recording setup
Recording quality: Average; improves with a good mic
Difficulty: Very easy
What you need:
- Spotify for Creators account
- Headphones
- Optional external mic (USB or Lightning)
How to record:
- Open Spotify for Creators: Sign in on your phone or computer.
- Launch Riverside integration: Record multi-track audio or video in-browser.
- Invite guests: Send them the link to join the session.
- Record your episode: Speak normally and watch levels to avoid clipping.
- Edit your recording: Trim sections, layer tracks, or add music using Riverside, Descript, or any editing tool you prefer.
- Export and publish: Save as MP3, M4A, WAV, MOV, MPG, or MP4 and upload directly to Spotify.
How to record a podcast on Zoom

Best for: Remote interviews with guests who need a simple setup
Recording quality: Good with external mic; backup improves reliability
Difficulty: Easy
What you need:
- Computer or smartphone with Zoom installed
- USB or XLR microphone
- Headphones
How to record with Zoom:
- Adjust audio settings: Go to Settings > Audio and turn on Original Sound for cleaner voice pickup.
- Plug in your mic: External mics reduce compressed laptop audio.
- Start your meeting: Hit Record and choose audio-only or video + audio.
- Use a backup: Use Riverside.fm or Zencastr to record a double-ender copy of your show or podcast as insurance.
- Edit: Clean up audio in editing software like Audacity or Adobe Audition.
How to record a podcast on a MacBook
Best for: Solo or co-hosted podcasts that want the best software for podcast interviews with full creative control
Recording quality: High with an external mic
Difficulty: Beginner-friendly
What you need:
- MacBook with GarageBand or Audacity installed
- USB or XLR microphone
- Headphones
How to record on a MacBook:
- Connect your mic: System Settings > Sound > Input > choose external mic.
- Open your software: Create a new track in GarageBand or Audacity.
- Check levels: Speak normally, adjust to avoid peaks.
- Hit record: Watch waveforms for consistent volume.
- Edit and export: Trim, add music, export as MP3 or WAV.
What Software Do You Need to Record a Podcast?
Think of podcast recording software as the control room of your podcast. It’s where you record, check your levels, clean up background noise, and shape the final version your audience hears.
Different tools do different jobs. Some are simple “press record and talk” apps. Others give you podcast studio level control so your podcast sounds polished enough to get you booked on more shows.
Here’s how each recording tool works and when to use it if you want to record high-quality audio and video.
How to record a podcast on GarageBand
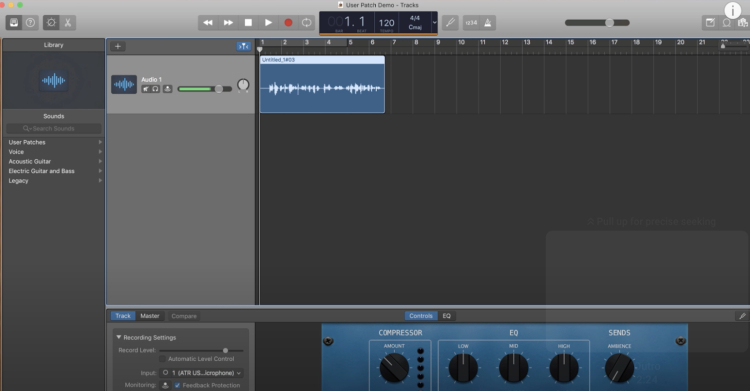
Best for: Solo podcasters on Mac who want clean, credible audio without extra tools
Recording quality: High with an external mic
Difficulty: Beginner-friendly
What you need:
- A Mac (GarageBand comes pre-installed)
- A USB or XLR microphone
- Headphones
How to record in GarageBand:
- Open GarageBand and choose Empty Project.
- Select Microphone as your track type.
- Go to Settings > Audio and choose your external mic.
- Speak normally and watch your levels (no red spikes).
- Hit record and start talking.
Settings that matter:
- Input device: Make sure it’s not the built-in mic.
- Monitoring: Turn it off to avoid echo.
- Volume levels: Aim for steady waves, not tiny lines.
If you’re just starting your podcast, this is more than enough to publish good-quality episodes.
How to record podcast episodes on Discord
Best for: Casual interviews or community-style shows where ease matters more than polish
Recording quality: Medium
Difficulty: Beginner-friendly
What you need:
- A Discord account
- Craig bot added to your server
- An external mic
- Headphones
How to record on Discord:
- Invite Craig bot to your server.
- Start a voice channel with your guest.
- Type :craig:, join to begin recording.
- End the session and download separate audio files.
Settings that matter:
- Mic input: Select your external mic, not your laptop mic.
- Headphones: Always use them to avoid echo.
Discord works fine for practice or internal types of podcasts, but compressed audio can make you sound less polished on public platforms.
How to record podcasts with multiple mics
Best for: Podcasters with co-hosts or in-person guests who want studio-quality audio
Recording quality: High
Difficulty: Beginner-friendly with clear steps
What you need:
- Audio-Technica ATR2100x or Shure SM7B
- Audio interface (Focusrite Scarlett 2i2) to connect XLR mics
- Headphones for monitoring
- Recording software (Audacity free, GarageBand Mac, or Adobe Audition paid)
How to set up:
- Plug in each mic and make sure your computer recognizes it.
- Assign each mic to a separate track in your software.
- Test levels by speaking normally and avoiding red spikes.
- Hit record and start talking.
Good to know:
- USB mics = easiest, no interface required
- XLR mics = better sound, interface required
- Monitoring helps catch issues live, not in post-recording.
With this setup, you and your co-hosts can record crystal-clear audio that makes your podcast sound credible and easy on the ears.
Best Free Podcast Recording Software
These free DAWs cover everything from simple recording to multi-track editing. Perfect for podcasters just starting out.
- GarageBand (Mac): Beginner-friendly DAW with intuitive multi-track editing.
- Audacity (Mac/Windows/Linux): Open-source editor for basic recording and audio tweaks.
- Descript (Mac/Windows/Web): AI-powered editor that transcribes and lets you edit like a doc.
- REAPER (Mac/Windows/Linux): Fully customizable DAW with a 60-day free trial.
- Waveform Free (Mac/Windows/Linux): Unlimited tracks and simple multitrack editing.
- Cakewalk by BandLab (Windows): Powerful workflow with unlimited tracks for Windows users.
- LUNA (Mac): Studio-quality DAW with classic hardware emulation.
- Pro Tools Intro (Mac): Industry-standard tools with a beginner-friendly podcast preset.
- Ardour (Mac/Linux/Windows): Non-linear editing for complex multi-track projects.
- SoundBridge (Mac/Windows): Easy-to-use interface with essential podcasting features.
- Podium Free (Windows): Straightforward DAW with unlimited tracks in the free version.
- Zrythm Free (Mac/Windows/Linux): Automated, intuitive workflow for quick podcast edits.
Best paid podcast recorder for beginners
For higher-quality audio, remote interviews, or AI-powered editing, these paid remote recording software are worth the investment.
- Riverside.fm ($29-$99/month): Browser-based podcast software that lets you record locally for crystal-clear audio and video.
- Zencastr ($30-$100/month): High-quality separate tracks and live audio mixing online.
- SquadCast ($24-$65/month): Allows you to record audio locally for multiple guests, perfect for interviews and video conferencing setups.
- Descript Pro ($24-$65/month): Transcript-based edits, Overdub, and social-ready clips.
- Alitu ($38/month): Automates audio leveling, remote calls, and adds royalty-free music.
- Zoom ($13.33-$18.33/month billed annually): Familiar interface for guest interviews with Original Sound.
- Ecamm Live ($20-$40/month): Mac-exclusive live streaming and multi-camera video recording.
- Boomcaster ($20-$75/month + per-minute fees): Local recording of WAV files with 4K video support.
- Cleanfeed ($36/month): Remote browser-based high-quality audio for multiple participants.
Where to Record a Podcast
Any quiet, controlled space works. Here are the best spots for remote podcast recording with concrete setup ideas:
- Closet: Hang clothes around you and place a rug underfoot for instant echo reduction.
- Bedroom corner: Move your desk near a bookshelf and hang a thick blanket behind your mic.
- Home office: Add foam panels on walls near your recording area and position your mic off-axis.
- Living room nook: Use couches and curtains as natural sound absorbers and record away from windows.
- Bathroom (small): Soft towels on counters and behind doors create a mini vocal booth for crisp audio.
Best way to record a podcast: Home studio vs professional studio
Whether you’re at home recording remotely or in a professional recording studio, your video and audio setup shapes your workflow and comfort.
Here’s what to expect from each before you start recording.
Recording at home? Most podcasters start this way, and with the right dedicated podcast setup, you can get clean audio without spending a fortune.
- Budget-friendly: No rental fees, invest in one good mic instead.
- Convenient: Record anytime, even at odd hours.
- Relaxed vibe: No pressure, take your time.
- Quick sound hacks: Record in a walk-in closet or between bookshelves to naturally dampen echo.
- DIY tech control: You decide mic placement, gain levels, and recording software settings.
- Background noise: Mask small hums with soft objects like pillows or a duvet draped behind you.
Thinking about a studio? It’s an option, but not a must. Studios offer perfect sound, no distractions, and expert support (but they come at a cost).
- Top-tier audio: Engineered space, premium microphones, and soundproofing.
- No manual tech setup: Engineers handle recording, compression, and file backups.
- Distraction-free: No pets, traffic, or household noises.
- Expense: Hourly rates can add up fast.
- Less flexibility: Must book time in advance, less control over the recording schedule.
Easy ways to get great sound anywhere when recording a podcast
You don’t always need perfect acoustics to capture great audio. These unconventional tricks can instantly upgrade your sound quality.
- Record with headphones on: Hear yourself live to control tone and energy.
- Add subtle ambient noise: Background hums can make solo recordings feel fuller.
- Change recording orientation: Standing or angled positions energize your voice.
- Use reflective surfaces creatively: Bounce sound off walls for natural warmth.
- Layer multiple takes: Blend lines from different takes for depth and clarity.
Podcast recording tips for better audio quality
Sound quality isn’t just about equipment. It’s about technique and strategy. These tips help you punch up your audio without extra podcast equipment bundles.
- Warm up your voice: Humming or lip trills improve clarity and resonance.
- Vary your pacing: Mix short and long sentences for a dynamic delivery.
- Use intentional pauses: Space helps prevent rushed, muddy audio.
- Script in blocks, not lines: Recording in thought sections makes editing easier.
- Batch record your content: Multiple episodes in one session keep audio consistent.
How to Record a Podcast Remotely
Recording a podcast remotely works when people know what’s happening, what’s expected of them, and what comes next. Control the human side of the session, and the tech becomes almost irrelevant.
- Set the rules before anyone joins: Who speaks first, how long answers should be, and whether interruptions are welcome.
- Start with a low-stakes warm-up question: It relaxes guests and settles voices before the “real” conversation begins.
- Use natural pauses instead of talking over each other: Leave half a beat after answers so the conversation stays clean.
- Handle corrections immediately, not later: If someone stumbles, let them repeat the sentence while it’s fresh.
- Flag transitions out loud: Say “next question” or “new topic” so edits are obvious later.
- Let one voice lead momentum: One person keeps the pace moving so the session doesn’t drift.
- End with a clean verbal wrap: A clear closing makes the episode feel intentional and easier to cut.
- Confirm next steps before anyone leaves: What happens to the recording, who edits, and when it goes live.
Best tools for recording remote interviews
Not all remote recording platforms are created equal. Some are simple and free, while others record high-quality, professional-grade audio.
Here’s a breakdown to help you prepare for a podcast interview:
- Headset monitoring tools (e.g., Loopback): Route and control audio from multiple apps on Mac for clean, balanced sound.
- Latency testing tools (e.g., PingPlotter): Check internet stability with guests to avoid audio lag or sync issues.
- Remote guest prep platforms (e.g., SquadCast guest prep screen): Share pre-session checklists and mic tests so guests are ready.
- Audio splitter apps (e.g., Soundflower): Send separate audio tracks from your mic and apps to your recording software.
- Virtual camera software (e.g., OBS Studio): Add overlays, graphics, and custom layouts when recording a video podcast.
- Real-time collaboration tools (e.g., Frame.io or Google Drive): Let editors and co-hosts comment and review recordings instantly.
- Noise analysis tools (e.g., iZotope Insight): Identify problem frequencies or background hums before editing.
- Remote cue systems (e.g., Slack or Zoom chat scripts): Give guests visual or text cues without interrupting the recording.
- Backup recording apps (e.g., QuickTime, Audacity): Capture a second copy of your audio in case the main track fails while you record your podcast.
- Multichannel audio mixers (e.g., Rogue Amoeba’s Audio Hijack): Adjust levels, EQ, and routing live for a professional sound.
- Automated transcription services (e.g., Descript, Otter.ai): Turn your recordings into text for easier editing and SEO.
- Recording analytics tools (e.g., Riverside Insights): Track recording quality, dropouts, and participant volume for smoother sessions.
How to avoid delays and audio sync issues
Lag and sync problems usually aren’t random. They’re the result of small decisions made before recording starts.
- Lock the clock: Start all recordings at the same time and avoid pausing mid-session unless absolutely necessary.
- Minimize live processing: Heavy real-time effects increase latency and raise the risk of audio drifting out of sync.
- Keep sessions lean: The longer the call, the higher the chance of timing drift. Break marathon recordings into parts.
- Avoid multitasking setups: Screen sharing, live browsing, or running extra podcast recording software increases timing instability.
- Watch waveforms, not faces: Audio glitches show up visually before they’re obvious to your ears. Pay attention.
When the people side is structured, remote recording stops feeling awkward and starts sounding intentional.
How to Record a Podcast With Video
Adding video to your podcast opens doors for social clips, YouTube repurposing, and a stronger connection with your audience.
Here’s a practical approach to high-quality video:
- Budget camera setups: Smartphones on a tripod with an external mic deliver surprisingly clear video for tight budgets.
- Plug-and-play webcams: Options like Logitech Brio or Elgato Facecam make remote recording fast and simple.
- Pro camera setups: Sony ZV-1 or Canon EOS M50 provide crisp, cinematic quality for premium video podcasts.
- Creative lighting hacks: Bounce sunlight off white walls, use LED panels for soft shadows, or place a desk lamp behind a diffuser for an easy DIY glow.
- Backgrounds with personality: Keep it clean but branded with plants, shelves, or subtle props to make your frame look professional without expensive studio design.
- Software versatility: Riverside.fm and Zencastr for HD tracks, Ecamm Live or OBS Studio for streaming, or Zoom for quick-and-easy video calls. (I compared Zencastr vs Riverside to help you decide faster.)
- Test before recording: Frame your eyes in the top third, check lighting angles, and confirm audio levels to avoid surprises mid-episode.
How to Record and Edit Your Podcast
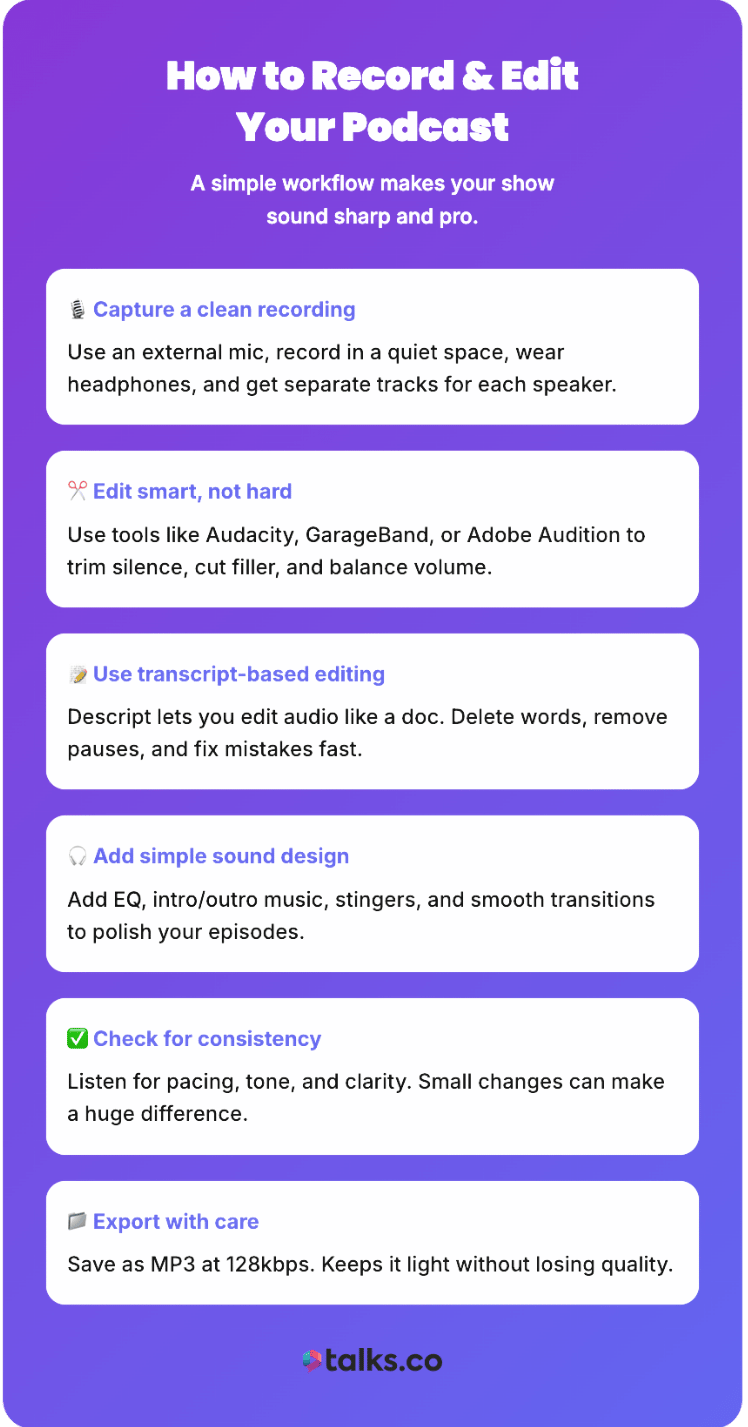
Recording a remote podcast is just the first step. A raw audio will have pauses, background noise, and filler words. Editing cleans it up and makes your podcast sound professional and engaging.
The good news? A simple workflow and the right audio editing software will do the job.
- Capture a clean recording: External mic, quiet space, headphones, and separate tracks for each speaker make editing a breeze.
- Edit smart, not hard: Use Audacity, GarageBand, or Adobe Audition to trim dead air, cut filler words, and balance volume.
- Leverage transcript-based editing: Tools like Descript let you edit audio as if you’re editing a document. It’s fast and intuitive.
- Enhance with sound design: Add EQ for clarity, intro/outro music, stingers, and subtle transitions for a professional finish.
- Check consistency: Listen through for pacing, energy, and clarity. Small adjustments make a big difference.
- Export with care: MP3 at 128kbps keeps file sizes manageable while maintaining clear spoken audio.
How to Publish Your Podcast
You’ve recorded and edited your podcast and the podcast guest release form is signed. Now it’s time to share it with the world. This part trips up a lot of new podcasters, but publishing is easier than you think.
Here’s how to upload it to a podcast distributor like Spotify, Apple Podcasts, and more.
Step 1: Choose your podcast hosting services platform
You can’t upload a podcast directly to Spotify or Apple Podcasts. Instead, you need a podcast host to store your episodes and generate an RSS feed (which platforms use to pull your content).
Best platforms to host your podcast for free:
- Spotify for Podcasters (Anchor): Free and beginner-friendly.
- Podbean (Free Plan): Decent features but limited storage.
- RedCircle: Free with revenue-sharing options.
Best paid podcast hosting platforms:
- Buzzsprout ($19/month): Easy-to-use with analytics and scheduling.
- Libsyn ($12-$150/month): Trusted by big podcasters, good for long-term growth.
- Transistor ($19+/month): Lets you host multiple shows under one account.
Look for hosts that automatically distribute your podcast show, offer analytics, and have affordable storage.
Step 2: Submit your podcast to major platforms
Once your episodes are uploaded, submit your RSS feed to podcast directories so listeners can find you.
- Apple Podcasts: Sign up at Apple Podcasts Connect, add your RSS feed, verify your show, and submit (approval takes 24-72 hours).
- Spotify: Use Spotify for Podcasters, enter your RSS feed, verify your email, and submit (approval takes a few hours).
- Google Podcasts: Submit via Google Podcasts Manager, verify ownership, and wait for indexing (can take a few days).
Most podcast hosts also distribute to Amazon Music, iHeartRadio, and other directories automatically. Check your settings to enable this.
Step 3: Write a strong podcast description and show notes
Your podcast description and episode show notes help attract listeners and improve searchability.
Podcast description:
- Who is it for? (Coaches, entrepreneurs, speakers, etc.)
- What will they learn? (Topics, insights, expert interviews)
- Keep it short, clear, and compelling (two to three sentences).
Example:
“The Daily Coach Podcast helps speakers, coaches, and entrepreneurs grow their audience, authority, and income through powerful content and expert interviews. Each episode delivers actionable strategies to build a thriving business while making an impact.”
Episode show notes:
- Title: Clear and searchable.
- Short summary: What’s covered? Who’s the guest?
- Key timestamps: Helpful for long episodes.
- Links and resources: Mentioned books, tools, or guest websites.
- Call to action: Ask listeners to subscribe, leave a review, or visit your site.
How to Promote Your Podcast
The first few weeks after launching are crucial. More early listeners mean better rankings and more visibility on platforms like Spotify and Apple Podcasts.
Here’s how to build momentum fast:
- Launch with multiple episodes: Start with at least three to five episodes so new listeners can binge right away. This boosts downloads and helps your show gain traction faster.
- Encourage ratings and reviews: Platforms like Apple Podcasts prioritize shows with engagement. Ask friends, colleagues, and social media followers to leave a review or rating to improve visibility.
- Submit to multiple directories: Don’t just rely on Spotify and Apple Podcasts. List your show on Google Podcasts, Amazon Music, iHeartRadio, Stitcher, and TuneIn to maximize reach.
- Optimize your titles and descriptions: Use clear, searchable episode titles with relevant keywords. Instead of “Episode 1: Growth Tips,” try “How Coaches Can Grow Their Audience Using Podcasting.”
- Create a launch promo plan: Treat your podcast launch like an event. Announce it to your email list, post teaser clips to promote your podcast on social media, and share in relevant online communities.
- Use social media strategically: Posting a link isn’t enough. Repurpose content by sharing short video/audio clips, turning episodes into Instagram carousels or X threads, and engaging with comments.
- Leverage other audiences: Invite guests with an existing audience who will promote the episode. Get interviewed on other podcasts in your niche, and swap shoutouts with podcasters who share a similar audience.
Ready, Set, Record!
Starting a podcast might seem like a lot, but once you have the basics on how to record a podcast down, it’s all about consistency and getting in front of the right audience.
That’s where Talks comes in.
Create a free Talks profile and you’re instantly easier to find, easier to book, and easier to say yes to.
Your speaker page updates automatically with every podcast you appear on, helping you rank on Google and AI search while you sleep.
No spreadsheets. No cold DMs. No chasing hosts who never reply.
Talks does the heavy lifting:
- Smart matches based on your niche and goals
- Auto-messages that start the conversation for you
- Suggested guests and shows you’d actually want to say yes to
You show interest. Talks handles the matching. You book the interview and hit record.
If you’re already putting in the work to record episodes, don’t let them disappear into the void.
Create your FREE Talks profile and start booking better podcast conversations today.
 + Free Intro Generator 2026")

