")
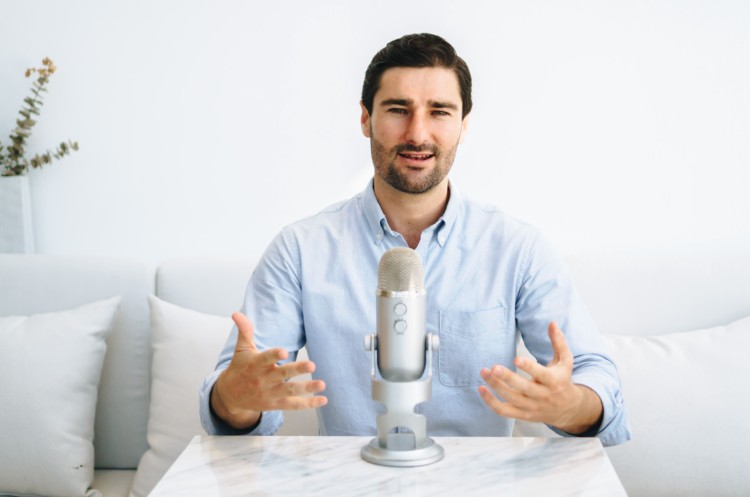
So you’ve got your Blue Yeti mic.
You plug it in, hit record, and play it back… flat. Too quiet. Bit of background hum. Or just not that crisp, “this could be in a pro studio” sound you had in mind.
I know the feeling.
I bought my Blue Yeti USB mic back in 2015 and I still use it today.
I’ve recorded hundreds of podcasts and interviews with it from my home office here in Malta, hotel rooms halfway back to Australia, even at the kitchen table while Sarah’s directing and positioning the lighting.
And here’s what I’ve learned: it’s not about fancy upgrades or expensive gear. It’s about knowing the right Blue Yeti microphone settings for what you’re actually doing.
Once you’ve nailed that, you can get clear, warm, professional sound quality for your podcast content, Twitch video streams, coaching calls, or Zoom interviews.
In this guide, I’ll show you exactly how to set your Blue Yeti for different situations, select the right polar pattern, set your gain for your distance, and use a few small accessories that make a big difference.
By the end, you’ll have the same tech setup I’ve relied on for years to sound sharp, confident, and ready for any recording.
Blue Yeti Microphone Best Settings
Before you start messing with patterns, filters, or fancy extras, nail the basics.
Your gain, sample rate, and mic placement are the backbone of every clean, balanced recording.
Also, make sure your computer recognizes your Blue Yeti:
- Windows: Set BLUE Yeti as your default input/output, adjust sample rate to 48kHz 16-bit, and uncheck “Allow applications to take exclusive control.”
- Mac: Select Blue Yeti under Input and Output in System Preferences, then set the sample rate to match your software.
Talks tip: Reconnect the USB or try a different port if the mic isn’t detected.
Start here, and the rest of your setup will fall into place naturally.
Blue Yeti microphone settings for podcast

Podcasts live or die on consistency. Listeners will forgive the occasional stumble in your words, but not sudden volume jumps or a noisy background.
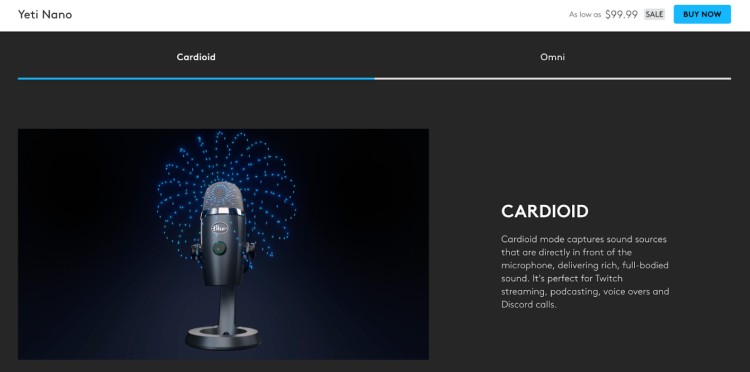
- Use cardioid pattern for focused, solo recordings.
- Sit a consistent distance from the mic to maintain tone.
- Keep gain low to avoid breath pops and keyboard clicks.
Talks tip: Record a short test before starting. Adjust gain slightly if peaks occur, but keep your distance consistent for even tone.
Settings:
- Pattern: Cardioid
- Gain: 25-35%
- Sample rate: 48kHz, 16-bit
Hear the Blue Yeti in action on my guest spot on The Savvy Podcast. It’s a good example of how this mic handles a real podcast setup.
Blue Yeti microphone settings for Discord
Discord calls usually happen in rooms that aren’t exactly studio-grade, so clarity matters more than warmth.
- Cardioid mode keeps your voice front and center.
- Keep gain low (around 20-25%).
- Use Discord’s Noise Suppression and manually set Input Sensitivity.
Talks tip: Turn on Automatic Gain Control for a steady, clear volume.
Settings:
- Pattern: Cardioid
- Gain: 20-25%
- Sample rate: 48kHz, 16-bit
Need a mic that works perfectly on Discord and other platforms? Check out the full Talks guide on the best podcast microphones.
Blue Yeti microphone settings for streaming
For Twitch or YouTube streams, your goal is a voice that cuts through background noise and game audio without distortion.
- Cardioid works for solo streams; bidirectional for co-hosts in the same room.
- Adjust gain mid-range (30-40%) depending on your expressiveness.
- Consider OBS or Streamlabs compression and EQ to sit above gameplay.
Talks tip: Use software filters to enhance presence, not to fix poor mic placement.
Settings:
- Pattern: Cardioid (solo) / Bidirectional (co-host)
- Gain: 30-40%
- Sample rate: 48kHz, 16-bit
Blue Yeti USB microphone settings
The standard Blue Yeti USB is versatile. For almost every solo recording scenario, cardioid pattern is the winner.
- Adjust gain so peaks are around -6dB in your recording software.
- Avoid extra filters during recording; better to tweak clean audio afterward.
Talks tip: Keep recordings clean and apply EQ or effects post-recording.
Settings:
- Pattern: Cardioid
- Gain: Adjust for peaks around -6dB
- Sample rate: 48kHz, 16-bit
If you’re starting a podcast, my how to record a podcast guide walks you through every step, including using a Blue Yeti.
Blue Yeti Nano mic settings
The Nano is smaller but still powerful. It only has cardioid and omnidirectional patterns, so choose wisely.
- Cardioid is perfect for solo recordings, with gain around 25-30%.
- Omnidirectional works for multiple speakers or capturing room ambiance, with gain closer to 35-40%.
Talks tip: In omni mode, think “equal seats at the table”. Same distance, same sound.
Settings:
- Patterns: Cardioid / Omnidirectional
- Gain: Cardioid 25-30% / Omnidirectional 35-40%
- Sample rate: 48kHz, 24-bit
Budget-conscious? Our best budget microphones guide shows top options, including the Nano.
How to Use Blue Yeti Microphone
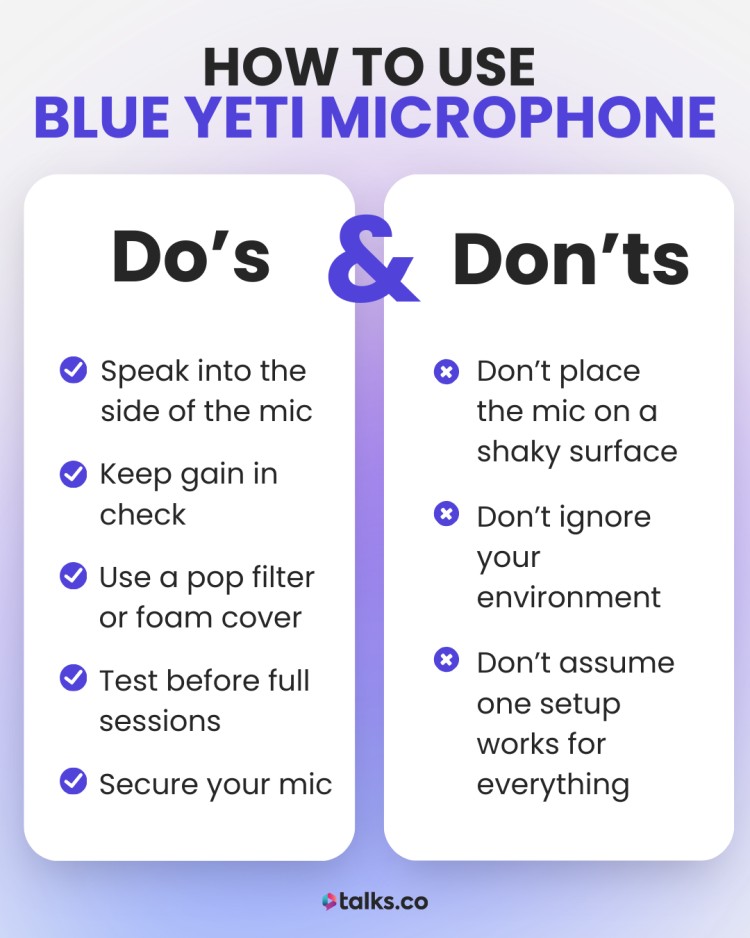
Getting great sound isn’t just about plugging in your Blue Yeti. Even with the right settings, poor technique can leave your recordings hollow, distorted, or noisy.
Here’s the top dos and don’ts I’ve learned from hundreds of sessions that make a real difference when recording with your Blue Yeti microphone:
Dos
- Speak into the side of the mic: The Blue Yeti is side-address. Aim slightly off-center for natural, full-bodied audio. If you lean directly on top, your voice can sound muffled or boomy.
- Keep gain in check: Low to medium gain keeps background noise down and prevents clipping. Test in your recording software (OBS, Audacity, Discord) to see peaks around -6dB.
- Use a pop filter or foam cover: Softens harsh “p,” “t,” and “k” sounds for cleaner recordings, especially if you’re close to the mic.
- Test before full sessions: Record a short sample to catch room echo, fan noise, or software input issues.
- Secure your mic: Use a stable desk stand or a Blue Yeti mic boom arm with a shock mount to reduce vibrations and desk bumps.
Don’ts
- Don’t place the mic on a shaky surface: Typing, desk bumps, or vibrations will ruin audio quality.
- Don’t ignore your environment: Fans, air conditioners, or reflective walls can bleed into your recordings. Make small room tweaks before tweaking software.
- Don’t assume one setup works for everything: Adjust pattern, gain, and placement depending on the number of speakers, room size, and software you’re using.
Talks tip: Combine physical adjustments with software checks like Noise Suppression or EQ.
For a full setup checklist including gear costs and extras, see what equipment is needed for a podcast and how much podcast equipment costs.
Blue Yeti mic pattern settings
Picking the right pattern is your first step to clean, controlled audio. Each mode handles sound differently, so knowing when to switch is key:
- Cardioid: Captures sound from the front of the microphone, blocks sides and back. Ideal for solo podcasting, voiceovers, Twitch streams, or Zoom calls. Keeps your voice focused while cutting room noise.
- Omnidirectional: Picks up sound evenly from all directions. Use this for roundtable discussions, interviews with multiple speakers, or recording ambient room audio.
- Bidirectional: Captures front and back, ignoring the sides. Perfect for face-to-face interviews or co-hosted streams in the same room.
- Stereo: Separates left and right channels. Best for music, ASMR, or recordings where spatial audio matters.
Talks tip: Always test a short recording after switching patterns.
Blue Yeti mic directional settings
When it comes to the Blue Yeti mic, small tweaks in angle and placement can make a huge difference especially in tricky rooms or multi-speaker setups.
- Angle slightly toward your mouth (10-15 degrees) to soften plosives without leaning directly on the mic.
- If recording near hard surfaces, tilt the mic slightly down or rotate away from reflective walls to reduce echo.
- For two people in the same room, position the mic midway and adjust the angle so both voices are captured evenly.
- Keep roughly 6-8 inches from your mouth for a balanced mix of warmth and clarity.
Talks tip: Monitor levels in OBS, Discord, or Audacity while adjusting angles. This lets you catch clipping or room hum before recording the full session.
Blue Yeti microphone knob settings
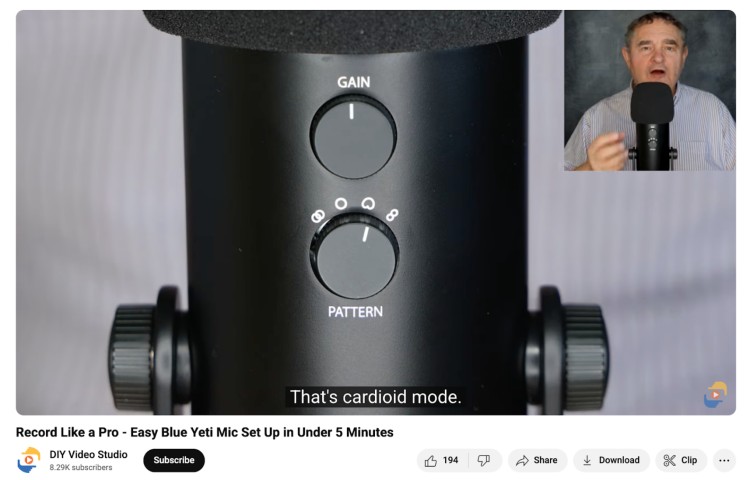
Your gain knob controls how much sound the mic picks up, not how loud you sound in headphones. Too high, and you’ll catch background noise; too low, and your voice may be faint.
- Start with gain around 25-35% for solo recordings.
- Test by speaking naturally and checking levels in your software; aim for peaks around -6dB.
- Adjust depending on distance, room noise, and pattern.
Talks tip: Make small adjustments rather than cranking the knob. Subtle changes have a big effect on audio quality.
Blue Yeti Microphone Settings on Back
The controls on the back of your Yeti let you tweak usability on the fly without touching software.
- Mute button: Instantly cut audio for streams, calls, or quick interruptions.
- Headphone volume knob: Adjust monitoring volume independently from your recording.
- Pattern switch: Flip between cardioid, bidirectional, omnidirectional, or stereo depending on the session.
Talks tip: Familiarize yourself with these switches to make quick mid-session adjustments.
Blue Yeti Mic Stand Setup
Where you place your mic on a Blue Yeti mic stand depends on your room. A small bedroom, shared apartment, or living room all have different acoustic challenges:
- Home office/desk nook: Tight space, lots of reflections from hard surfaces; focus on off-axis mic placement and using soft panels or blankets.
- Kitchen/dining table: Often noisy, reflective surfaces; use low gain, directional pattern, and position away from appliances.
- Bedroom closet/wardrobe booth: Small, enclosed spaces with clothes; great natural acoustic treatment. Cardioid pattern and close placement work best.
- Shared living space/lounge: Large room, echo-prone; use rugs, curtains, or temporary foam panels, and stay close to the mic.
- Hotel room/travel setups: Limited space, unknown acoustics; lean on cardioid pattern, low gain, and portable pop filters.
- Garage/basement: Echo-heavy, lots of hard surfaces; position the mic away from walls, use softening materials if possible, and low gain to cut reverb.
Talks tip: Wherever you record, start with low gain, cardioid pattern, and 6-8 inches distance. Then tweak based on room size, background noise, and how many people are speaking.
Blue Yeti mic arm setup
A boom arm gives you freedom a desk stand can’t. You can move, raise, or angle your mic without touching your desk. Perfect for multi-speaker recordings, shared spaces, or echo-prone rooms.
Here’s how to make it work in different setups:
- Home office: Free up tight desk space and position the mic exactly where you need it. Keep 6-8 inches from your mouth and angle slightly off-axis to reduce plosives.
- Multi-speaker recordings: Extend the arm to capture each voice evenly. Use cardioid for solo focus or bidirectional for two-person setups.
- Streaming/gaming setups: Keep the mic out of the way of monitors, keyboards, or controllers. Low gain and a pop filter help avoid picking up background audio.
- Travel/temporary setups: Portable arms let you record in hotels or rented spaces. Cardioid pattern and careful angle adjustments reduce reflections from hard surfaces.
- Echo-prone rooms: Use the arm to move the mic away from walls or reflective surfaces. Add soft panels, blankets, or rugs where possible.
- Shared desks/podcasting: Isolate the mic from laptop vibrations or typing noise. Off-axis placement preserves clarity for your voice.
- Live calls/Zoom meetings: Swing the mic in and out of the way easily while keeping a consistent distance when speaking.
Need extra help setting up? Read the best microphone boom arm guide to help you position your mic perfectly.
Is the Blue Yeti a Good Microphone?
I’ve put this mic through just about everything. Early-morning calls, late-night interviews, echoey hotel rooms, even a few outdoor recordings when I had no other option.
Since 2015, it’s survived drops, long flights, and more episodes than I can count. The Blue Yeti microphone isn’t perfect, but it’s reliable and sounds great. Plus, at this price point? The Blue Yeti is worth it.
Pros:
- Multiple pickup patterns: Cardioid, bidirectional, omnidirectional, and stereo for any recording setup.
- Clear, broadcast-quality sound: Rich tone that works great for podcasts, streaming, and voiceovers.
- Plug-and-play USB connection: No extra gear needed. Just connect and start recording.
- Solid build with included stand: Sturdy and ready to use out of the box.
- Wide compatibility: Works with Windows, macOS, and most recording software.
Cons:
- Picks up background noise: Needs good placement and gain control to avoid echo and unwanted sounds.
- Bulky size: Not ideal for travel or small desks.
- Limited onboard controls: Less fine-tuning than higher-end XLR mics.
You’ve Got the Sound, Now Get the Stories
Your Blue Yeti microphone settings can make or break your sound. Once you’ve got them dialed in, you’ve removed one of the biggest barriers between your message and your audience’s ears: poor audio.
From here, it’s all about what (and who) you put in front of that mic.
That’s where Talks comes in.
Instead of trawling through social media or sending out endless guest requests, you can connect directly with people who have something worth saying and who’ll sound just as good as you.
Create your free Talks creator profile today, start getting matched, and book the kind of guests that keep listeners tuned in episode after episode.
Set up your free Talks creator profile now.
 + Examples & Guide")

